Air Leak Tester is the automatic leak detector detects any leaks by the minute change of differential pressure and conducts OK/NG judgment. Ideal to be built into a production line for a laborsaving and a quality control purpose
Variety ranges from F.S.10mL/min to F.S 500L/min are available. Promotes an automation and a laborsaving of the measurement
Helium Leak Tester adopts the new testing method and Helium Leak Tester adopts the new testing method and
All Manometer comes with a traceability. Wide range of Manometers, from a micro pressure (F.S. 200Pa) to a high pressure (F.S. 50MPa) are available
Peripheral instruments are used with Air Leak Tester in order to enhance its functionality and convenience
We determine the acceptability of the sounds and vibrations of products using our special analyses developed in-house.
Materials combining unprecedented flexibility and durability
| Differential Pressure | Resolution | 0.1 Pa |
|---|---|---|
| Display Range | ±999.9Pa、(Accuracy guaranteed range±1000Pa) | |
| Accuracy | ±2.5% of rdg ±1Pa、50Pa or lower±2Pa | |
| Sensor Proof Pressure | 5 MPa | |
| Dislay Unit | Test Pressure | kPa,MPa (Non SI Unit for overseas use kg/cm2, PSI, bar, mmHg,他) |
| Leak Rate | Pa, kPa, mL/s, mL/min, L/min, Pa・m3/s, E-3 Pa・m3/s, Pa/s, Pa/min,*Pa/s, *Pa/min (Non SI Unit for overseas use mmH2O, mmHg, inH2O,Others) | |
| K(Ve)(Leak Coefficient) | mL, L (Non SI Unit for overseas use in3, ft3) | |
| Leak Rate Display | 4 digits、Sampling Rate 10 times/sec | |
| Leak Limit | ±999.99 max | |
| Number of Channels | 32ch(0~31) | |
| Timer | 999.9 sec(Resolution 0.1 sec) | |
| Power Source | AC100~240V±10%, 50/60Hz,70VA max | |
| Ambient Temperature | 5~45 ℃ | |
| Humidity | 80% RH or less / No dew condensation | |
| Weight | Controller: approx. 2.6kg、 Pneumatic unit: approx. 4.4kg | |
| Test Pressure Source | Clean and dry air regulated to the test presssure Source pressure must be sufficiently higher than the test pressure | |
| Pilot Pressure | Set by using the pilot pressure filter regulator installed: Range: 400 to 700kPa | |
| Port Size | Ф6mm One-touch joint:Pilot pressure source, Test pressure source Special joiint:WORK and MASTER port | |
| CPU | SH-2A 144MHz, DRAM8MB | |
| RS-232C (D-sub 9pin) | I/F fixed length ID/F fixed length | Test parameter as well as test results are transmitted |
| T/F fixed length | Only test results are transmitted | |
| Others | Special formats | |
| USBポート | Test data | Judgment, Leak, Test pressure, Channel #, Time, etc |
| Test parameter | Test parameters of all the settings screens | |
| Standard Accessories | Pilot pressure filter regulator Quick mounting brackets , Control I/O connector, Power cord, Inspection records , Operation manual, Traceability documents | |
| ① | Test Circuit | Y Circuit | Y | Tester circuit with minimum internal volume |
|---|---|---|---|---|
| ② | Test Pressure | Low Pressure | L | Test pressure range 10 ~ 100 kPa |
| Medium Pressure | M | Test pressure range 50 ~ 700 kPa | ||
| Vacuum Pressure | V | Test pressure range -5 ~ -100 kPa | ||
| ③ | Option | With ALC 0.1 | K01 | Volume displacement 0~0.1mL |
| With ALC 0.01 | K001 | Volume displacement 0~0.01mL | ||
| With Calibration port | JX | Leak master can be mounted | ||
| Panel Mount | P | The controller is designed to be panel-mounted | ||
| ④ | Sensor Sensitivity | Ks=0.005mL/kPa | KX1 | Standard |
| Ks=0.0025mL/kPa | KX05 | Opption | ||
| ⑤ | Cable Length Specified | Unit-to-unit cable 3m | S3 | Standard |
| Unit-to-unit cable 5m | S5 | Opption | ||
| Unit-to-unit cable 10m | S10 | Opption |

Controller

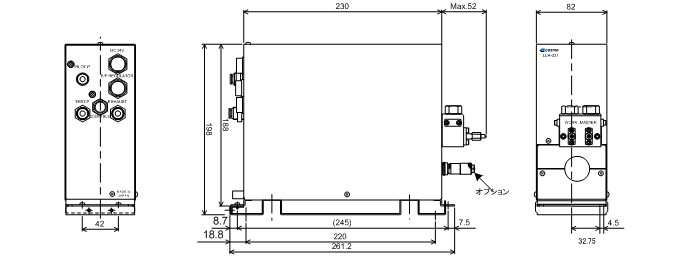
Pneumatic Circuit Unit
Helps reduce measurement errors and false rejects due to part temperature effects.
Compensation graphs viewed on large LCD screen.
Easy setting for mapping of the graphs.
Temperature compensation mapping should be adjusted on the actual production line.
The temperature difference between the part and the environment is measured to carry out the Temperature Compensation according to the correlation between the temperature difference and measurement errors.
Post-cleaning leak tests, engine parts (cylinder head, cylinder block)
(a correlation should exist in the differential pressure between the temperature of Work and the applied air)
Example of Temperature Compensation Data
| Tested part | Oil pan (Whole) |
| Test pressure | 100kPa |
| Equivalent internal volume | 2500 mL |
| Leak specification | 10 mL/min |
| Test timers | Pressurization 22 secs. Equalization 3 secs. Stabilization 5 secs. Detection 3 secs. |
Unveiling a new chapter — the grand inauguration of our Head Office is successfully complete.
Started a new venture manufacturing plant at Bengaluru.
⚡ EV Summit | 22 Aug 2025 | New Delhi – Driving the future of electric mobility!
© Copy Rights 2024 Cosmo Instruments India Pvt. Ltd.