(1)Differential pressure decay method
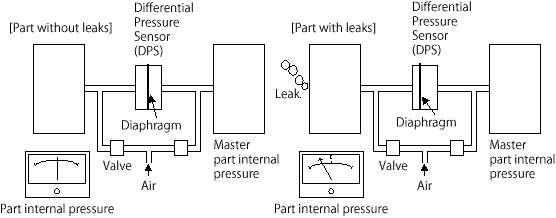
After impressing air pressure into the part under test (WORK), the change in internal pressure is measured to evaluate for leaks.
A non-leaking standard (MASTER) is used, and is pressured at the same time as WORK. A highly sensitive differential pressure sensor detects any difference due to leaks between the change of the internal pressures of WORK and MASTER.
(2)Operating air leak testers
A Startup: After sealing WORK with clamps, the startup signal is entered.
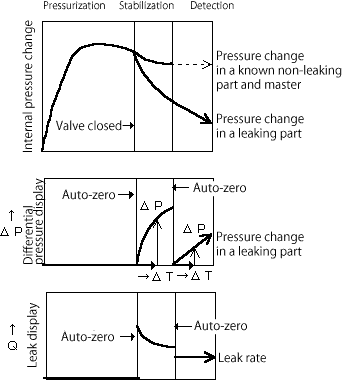
B Pressurization stage (CHG): WORK and MASTER are impressed with the test pressure. Time is required for the internal pressure to stabilize to some extent,.
C Stabilization stage (BAL): Valves AV1 and AV2 inside the tester are closed, making the test section a closed circuit. The difference in pressure between WORK and MASTER is detected. This stage is the time to wait for the change in pressure to stabilize after closing the valves, and is also stage to detect any major leaks.
D Detection stage (DET): Minor leaks are detected.
E Exhaust and completion: Pass or Fail signal is output, and air is blown through the tester and the air inside WORK is blown out.
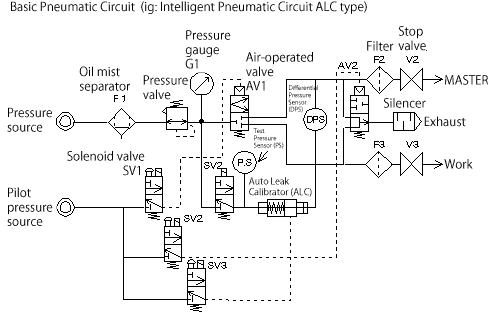
See “Leak calibration in practice” in The Basics of Setting Up to learn about auto leak calibrators.
| Solenoid valve symbol | DL1 Delay | CHG Pressurization | DL2 Delay | BAL Stabilization | DET Detection | DL3 Exhaust | END Completion |
|---|---|---|---|---|---|---|---|
| SV1 | |||||||
| SV2 |
(3)Changes in WORK internal pressure and display of leak rate
During the stabilization or detection stage, the differential pressure ΔP is calculated according to the equation below after auto-zero is performed. The leak rate is displayed every 0.1 seconds in the unit mL/s or mL/min.
If the leak rate does not change and remains constant during the detection stage, no additional detection time is required.
(1)principle
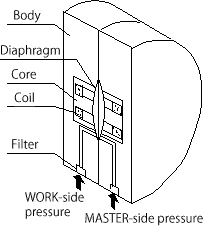
Due to magnetic flat diaphragm being used in pressure receiving part, micro displacement detected as impedance change. And safety wall preserve the diaphragm against excess pressure.
(2)Silent feature
* Linearity range: 0~±1000Pa or 2,000Pa (Depends on model)
* High Sensitivity optical resolution: 1Pa or 0.1 Pa (Depends on model)
* High Proof pressure Standard: 5MPa (Max 16Mpa)
* Volume deviation ratio: 0.01 ml/kPa or 0.005 mL/kPa (Depends on model)
With the gauge pressure decay method, after the pressure is sealed in, the drop in pressure is presented directly as the amount of change on the pressure sensor.
| Differential pressure detection method | Gauge pressure decay method (direct pressure detection method) | |
| Sensitivity | *Not limited to the test pressure, the differential pressure sensor can use the minute differential pressure range, allowing for leak tests which are constantly highly precise. | A pressure sensor corresponding to the range of the test pressure is used, lowering the resolution as the pressure gets higher, making the leak detection sensitivity worse. |
| Temperature | *Effects of the rise in temperature of the sealed air or changes in temperature are offset by being compared with MASTER, and are thus minimal. The resolution is high, so a high detection rate is possible, even with a short detection time. | *Effects of the rise in temperature of the sealed air or changes in temperature are present as inaccuracies. The sensitivity is low, requiring a longer detection time. *If the test time is the same, a longer detection time would limit the pressurization and stabilization times, and the test would contain large inaccuracies. |
| Effects of temperature and deformation |
Initial pressurization would contain much pressure change (inaccuracy) due to adiabatic change and volumetric change. | |
| Adaptability | Even when the test pressure is changed, a common differential pressure sensor can be used. | To achieve maximum sensitivity, a sensor with a range matching the test pressure must be used. |
The various methods that follow are combined to find the methods which is most suitable for the target WORK.
(1)Choosing by test pressure
| 【Pros】 | 【Cons】 | ||
| Pressurization method | *Test by applying positive pressure *Target: For WORK which would be used at high internal pressure, WORK which would contain liquids | *Detection rate can be increased by increasing the test pressure * Leak locations can be checked by visually checking for bubbles | *Susceptible to changes in pressure (by changes in temperature, effects of deformation, etc.) |
| Depressurization method | *Test by vacuum pressure by pulling the part in a vacuum *Target: For WORK which would be used in vacuum pressure, WORK which would change in temperature or shape during testing | *Not susceptible to causes of change in pressure (changes in temperature, deformation, etc.) | * Testing pressure is limited compared to positive pressure; leak rate would be smaller from the same hole diameter *Affected by vapor pressure of water or oil |
(2)Choosing by the shape of WORK
| 【Pros】 | 【Cons】 | ||
| Internal pressure detection method | Measures the interior of WORK *Target: For WORK in general, WORK with many openings | *Tooling cost is lower than external pressure method *Reducing internal volume by using a core heightens sensitivity | Susceptible to temperature deformation at higher test pressures |
The normal method. A core is inserted to minimize the volumetric capacity of WORK, to raise the precision of detection and to shorten the testing time. | |||
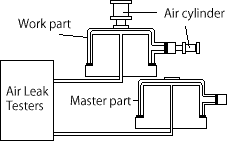
| External pressure detection method | WORK is pressurized inside and is surrounded by tooling, then the change in pressure of the gap is measured *Target: For WORK with few openings and not irregular in shape | *Not limited to test pressure, short in measuring time, and precise in detection *Very advantageous at high test pressures。 | ・Comparatively expensive tooling costs * Sealing of openings is difficult and sometimes cannot be visually confirmed |
Test time for WORK with large internal volume or which can be sealed easily with a capsule can be shortened by measuring the side of the leak exit by atmospheric pressure. | |||
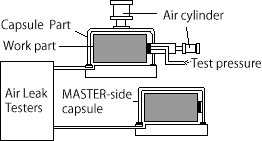
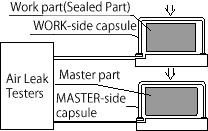
| Volumetric capacity detection capsule method | *WORK with large leaks are detected by converting the volumetric capacity of the gap between it and the capsule into differential pressure *Target: For sealed products without any openings for feeding air into(e.g. watches, electronic parts) | *Leaks ranging from very small to large leaks can be detected without dead zones. *Small parts can also be tested. | *Requires a capsule *A certain volume of space is required inside WORK *Cost of tester is high due to the requirement of a system to detect large leaks |
Used for sealed parts. In this method, leak is measured with the tested part pressurized in a capsule or held in a vacuum capsule. A process to detect large leak has been added. Also such a large leak that the pressure inside the tested part reaches the test pressure at the same time the part is pressurized can be detected. | |||
(3)Other test method application example multipiece method
- Method: tests multiple WORKs at once.
- Target: For WORK with small internal volume or when enough slack is available in detection. Used when a long time is required for pressurization (e.g. when effect of deformation exists).
- Pros: Testing time per one piece is reduced.
- Cons: Cannot be used when a precise measurement is required, or when there is a high fail rate.Multiple sets of test tooling are necessary. Multiple sets of test tooling are necessary.
Two-room simultaneous measuring method
- Method: When one WORK has two chambers to be measured individually, two testers impress different test pressures into each chamber to perform the tests at the same time.

- Pros: Testing time is reduced.
- Cons: If a leak exists in the partition between chambers A and B, the tester with the higher test pressure will judge its WORK as Fail, and the tester with the lower test pressure will judge its MASTER as Fail. Caution is needed when processing the judgment signals.
- Dealing with exhaust interference:
If one tester completes its judgment earlier and releases air, this may affect the measurement of the other tester.
We offer models which can be externally controlled to release air at the same time.


